How to use Video DownloadHelper 6 for Firefox
Note that this documentation does not apply to DownloadHelper 4 and previous versions. Most of it applies to DownloadHelper 5
How to install Video DownloadHelper
Go to the official Video DownloadHelper page on addons.mozilla.org and click the Add to Firefox button.
Note that VDH5 requires Firefox 36 and above. It will not work on Firefox 35 and earlier releases.
If you are of an adventurous temper, you may want to use some features before before they are made available for everyone. You can install early releases from the Video DownloadHelper development forum.
How to verify Video DownloadHelper is working
Go to this page. You should see in the Firefox browser toolbar an colored 3-balls icon.
The fact the icon is colored indicates there are videos to be downloaded.
Click on the icon to open the main panel.
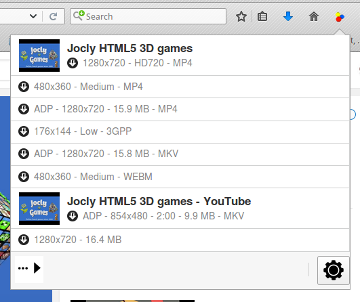
As everywhere else in Firefox, clicking outside the panel will close it.
Click on the first Jocly presentation item in the list. A File Save dialog opens to give you an opportunity to change the name of the file and/or the target folder. Confirm and your file will be soon be on your disk.
How to use the companion button
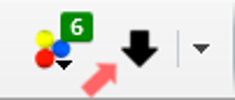
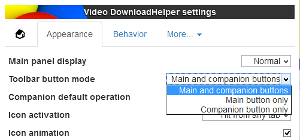
The companion button sits at the right of the main VDH toolbar icon. It provides a way to perform an operation from a single click, and most actions are available from a standard Firefox menu, very similar to what was in Video DownloadHelper 4. This button is not visible by default. To display it in your toolbar, go to the add-on settings > Appearance and set Toolbar button mode to Main and companion buttons.
Clicking the companion button runs the default action associated to the first hit from the page. By default, it is Download, (but this can be changed from the actions panel). If there is no hit in the page, it displays a global operation, by default opens the Supported sites panel, but it can be set from the settings (Appearance > Companion default operation) to About, Settings, Convert local file, Capture gallery or Clear hits.
Click on the little triangle next to the companion button to open a menu:
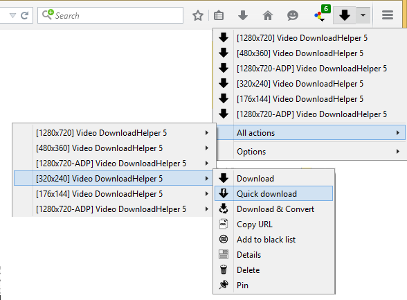
The first series of items in the menu are the hits from the current page. Clicking one of those entries runs the default action for this hit, for instance Download or Play if the video has finished downloading. The menu item All actions gives access to the same list of hits, but this time with a submenu that allows to choose which action is to be run. The last item, Options, is always present and gives access to global Video DownloadHelper operations.
You may legitimally consider that having two DownloadHelper buttons for similar controls is a waste of space. From the settings, section Appearance, you can tune parameter Toolbar button mode to select what you want to see in your toolbar:

Default mode
|

Main button only
|

Companion button only
|
How to download a video quickly
If you want to skip the file saving dialog and save with the default name to the default directory, click on the 3-dots sign at the right of an item, this opens the list of actions.
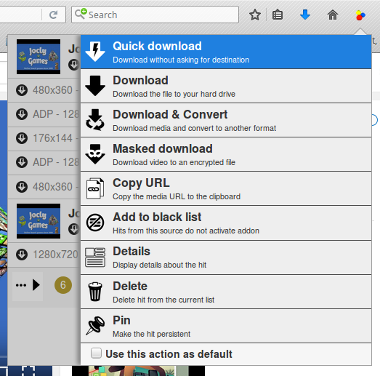
Check the parameter Use this action as default then click Quick Download. The file will start downloading immediately. Next time you open the VDH panel, simply clicking the item in the list (not the plus sign), it will use the new default action: Quick Download.
If you maintain the SHIFT key pressed when clicking on the video entry in the detection list, the Quick Download action will start without closing the panel. This way you can start several downloads quickly as you don't have to reopen the panel for each request.
How to read the number next to the VDH icon
This depends on the value for parameter Icon badge in the VDH settings, section Appearance. By default, it is set to Mixed, which means:
- if there are errors, they appear in red
- otherwise if there are pinned entries, they appear in black
- otherwise if there are running tasks, they appear in blue
- otherwise if there are media detected in the current tab, they appear in green
- otherwise if there are media detected in other tabs, they appear in orange
- otherwise no badge displayed
How to limit the number of displayed variants and control which ones must be listed ?
By default, Video DownloadHelper displays 6 variants per video. That's too many, we agree, but when we experimented with only 3 variants, many users complained about their favorite variant not being listed, so we increased that number.
You can easily change the number of listed variants from the add-on settings, section More / Video Qualities, parameter Max variants.
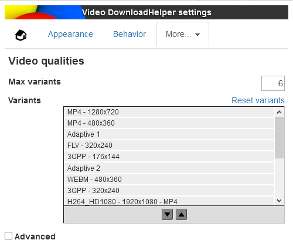
The displayed variants are the top ones defined in the Variants list. You can reorder those variants by selecting them and click the up/down arrows that appear at the bottom of the list.
You can notice some variants are labelled Adaptive n. This means: "use the nth variant from the adaptive variants list". The adaptive variants list can be seen and reordered by checking Advanced at the bottom of the settings panel.
How to prevent some videos from being detected ?
Many times, ads videos pollute the Video DownloadHelper hits list. If you want to make sure videos from a particular web site won't be considered by Video DownloadHelper, click on the ... sign at the right of the undesired hit, and pick Add to black list.
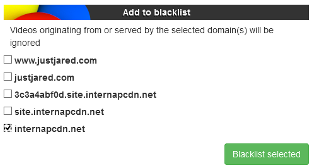
You can choose the domains for which videos served, or appearing in the page content will be ignored.
Alternatively, you can also add manually the domains from the settings: More / Black list:
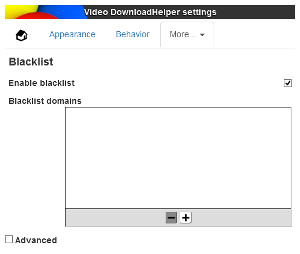
Removing domains from the black list can only be done from those settings.
How to define the name of the downloaded videos ?
Video DownloadHelper includes a feature called Smart Naming. It allows to rename automatically the video file being downloaded from text within the page that contains the video. Smart names are defined on a per-domain basis. By default, when Smart Naming is enabled, the name of the file is taken from the containing page name.
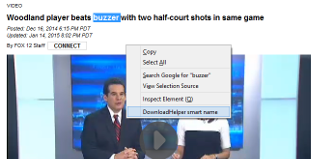
To define a video title from a particular site, go to a page containing a video you would like to download and mouse-select a word in the title. Note that it is better to select a word within the title, not at the begining, not at the end. Right-click and select DownloadHelper smart name.
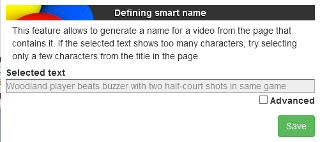
If the previewed name is ok to you, confirm.
You can remove smart name definitions from the settings, section More / Smart names.
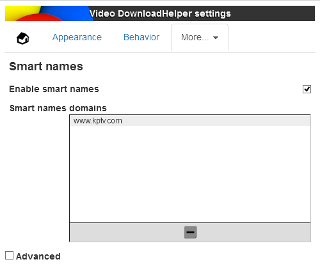
From those settings, you can also disable the smart naming feature as a whole. In this case, the file names will be created from the media URL itself.
Note that in future add-on version, it will be possible to disable smart naming on a per-domain basis.
How to capture media galleries ?
Video DownloadHelper has the ability to detect in a page series of links to media files and download them in a single operation.
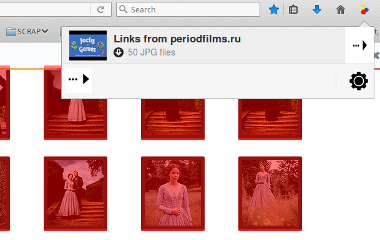
To detect a gallery of links in a page, open the main panel, pass the mouse over the ... button at the bottom left and click on the Analyze page icon:
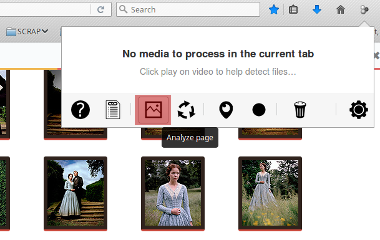
In this example, 50 JPEG images have been detected. When passing the mouse over the hit, the corresponding links are highlighted in the page.
By default, the gallery detection must be initiated manually, but if you have a frequent usage of this feature, you can automatically analyze any page that is opened: go to the settings, More > Gallery capture and check parameter Auto-detect.
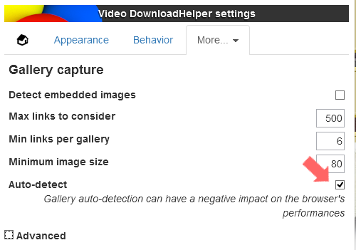
Other settings parameters for the capture gallery feature are:
- Detect embedded images: if checked, in addition to detecting media links, embedded images that seem to present some structural organisation in the current Web page can also be detected and downloaded. The corresponding hits appear as Gallery from www.example.com instead of Links from www.example.com. This feature did not exist in VDH4.
- Max links to consider: in order to prevent the browser from freezing for a moment in case a web page contains a large number of media links, the parameter defines a maximum count of links. If you need to capture more links than the default, increase this value.
- Min links per gallery: to consider a set of links as a gallery to be detected, it must contain at least this number of links.
- Minimum image size: when the Detect embedded images is checked, this parameter represents the minimum size in pixels of the image (in its smallest dimension.
How to use keyboard shortcuts
Video DownloadHelper allows some operations to be launched directly from the keyboard.
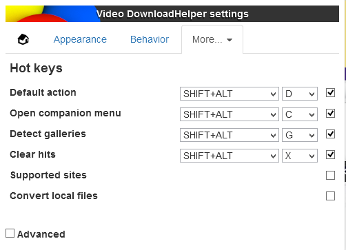
- Default action: SHIFT+ALT+D - runs the default action on the first hit in the page
- Open companion menu: SHIFT+ALT+C - opens the companion menu. Arrow keys and Enter can then be used to navigate the menu
- Detect galleries: SHIFT+ALT+G - detect links/images in the current page
- Clear hits: SHIFT+ALT+X - removes all hits that are not running nor pinned
- Supported site: not set - open the Supported sites panel
- Convert local files: not set - start converting local video files
The keys can be configured from the settings, More > Hot keys:
How to use pin/auto-pin ?
Normally, a detected video remains displayed in VDH while the window that originated this video is still loaded in the browser. When that window closes (you navigated to another page or close the tab), the video appears as "orphan" in VDH and it is removed from the list after 60 seconds (configurable). If you pin that video entry, it does not expire and remain in VDH until you explicitly remove it.
If you check Auto-Pin, once a video has been downloaded, it is automatically pinned in VDH.
A usage would be that, with Auto-pin set, you navigate the web and whenever you see a video you like, you request the download then continue browsing. After some time, there is in VDH a number of entries, corresponding to downloaded videos, that you just need to click to start playing locally.
How to get Video DownloadHelper in a specific language ?
If the add-on user interface appears in English and not in your browser's language, this means Video DownloadHelper does not have (yet) this locale. You can contribute by providing your translation using Babelzilla.
How to record automatically live streams from Twitter Periscope ?
Periscope allows to live stream videos from your smartphone. As the producer of the video, you have the ability to save it at the end of the recording. But as a watcher, you have no other choice than being there at the right time to see the live stream.
Video DownloadHelper uses the ability to record HLS chunked-streamed videos in order to provide the service to record Periscope live streams overnight (or days) and watch the captured videos when you have time. Of course, recording random videos may be a bit useless (but still funny, you should try it !), so you have the ability to provide a search query to match the stream session description. For instance, if you use cat as a search term and run Video DownloadHelper Periscope auto-recorder overnight, you will certainly find in the morning a serie of nice kitties to look at. Searching for breaking news might also be a good idea.
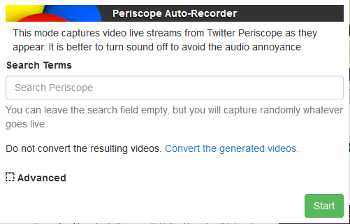
While the auto-recoder is in action, you will see tabs opening and closing in your browser, this is normal. Since those tabs do not take the focus, it won't affect your normal browsing. However, they are likely to produce sounds. It is probably a good idea to turn your computer sounds off during the capture session.

Start Periscope auto-recording
|

Stop Periscope auto-recording
|
How do i use the screen capture ?
The screen capture is a technology introduced in version 5.3 which allows to capture images of a region in a browser tab content at high speed and creates a video on the fly from those images.
This technology is used in 2 features:
- Browsing session capture: ideal to easily create a demo of a site usage.
- Applet capture: generally works where other capture methods fail.
Videos are created from a serie of still images and this job cannot be done by a browser addon. So, screen capture requires the converter to be installed on your computer.
Screen capture features share a common set of parameters that may be displayed and modified right before the actual capture starts, or from the settings, Screen capture section:
- 8x8 alignement: to ensure maximal performance, the height and width of the captured area must be a multiple of 8 pixels. This parameter Cut or Extend defines whether the region will be extended or restricted if necessary.
- Capture rate: the number of images per seconds in the generated video. You can reduce this value (default is 24 frames per second) if your computer is not powerful enough to encode the video fast enough.
- Converter port: change this value if the default TCP port 6872 is used by another application on your computer.
At the end of the screen capture session, a panel appears displaying some statistics:
- Original frame size: the size of the applet in the page.
- Captured frame size: the size of the captured region, which depends on the original size and the 8x8 alignment parameter.
- Captured frames:
- Captured: the number of screenshots taken.
- Skipped: the number of screenshots not taken because the frame rate was already reached (a high value here means your computer is fast, no need to worry).
- Missed: the computer was not fast enough to capture those frames, consider lowering the frame rate or reducing the window size if it makes sense.
- Saved frames:
- Saved: the number of frames saved to the converter.
- Failed: the number of frames that were destroyed because the converter was not has enough to transcode them. Consider lowering the frame rate or reducing the window size if it makes sense.
- Duration: the total duration of the capture.
Warning: this technology has a number of limitations you need to know:
- The screen capture is a CPU-demanding operation. If your computer is not fast enough to handle this, you may want to reduce the size of the window or the number of frames per seconds.
- At this point, Video DownloadHelper only captures the video, not the audio.
- In order to capture a moving video, the browser needs to refresh the region being captured. However, in some situations, Firefox/Flash does not render the image in order to save normally-unneeded CPU. This is the case when the tab you are capturing from is no longer active (the current tab is another one), or if Firefox is minimized on the desktop.
- There cannot be more than one screen capture at a time.
- Some Flash applets (seen on YouTube/Linux/NVidia drivers, depending on the OS and the machine) may render directly to screen and the captured video generates a black rectangle instead of the applet.
How to capture a browsing session ?
Starting from version 5.3, Video DownloadHelper can use its screen capture method to record the entire content of a browser tab and produce a video out of it, like this one (taken from jocly.com):
You can start and stop the recording from the main Video DownloadHelper panel (or companion button, context menu), by clicking Start SCRAP or Stop SCRAP.

Start recording
|

Stop recording
|
Before the recording start, a panel displayed where you can setup a number of parameters:
- Mouse recording: you may want (or not) to show clearly in the generated video where the mouse is. This parameter
defines when the mouse will be seen in the video.
- Never: the mouse is never shown.
- Always: the mouse is always visible.
- When SHIFT is pressed: the mouse is visible when the SHIFT key is pressed.
- When SHIFT is not pressed: the mouse is visible when the SHIFT key is not pressed.
- When the mouse is visible, parameters Halo radius, Halo color and Halo transparency define the round region around the pointer to be highlighted, while Pointer size defines the size of the pointer image.
You can also use the keyboard (ALT+SHIFT+W, configurable from the settings > Hotkeys) to start and stop the session recording. If you do so, the start panel is skipped and the last parameters are used.
Note that the captured region is the visible area in the window. If you scroll, this will be reflected in the generated video.
How to capture any applet ?
Some videos were completely ignored by traditional Video DownloadHelper detection methods because the network traffic for those videos does not go through the browser and an add-on cannot see it. This is the case of RTMP streamed videos you find on a number of sites, particularly when it comes to live streaming.
Starting from version 5.3, Video DownloadHelper can use its screen capture method to record a video from a region in a page. You first must tell the add-on to look into the current for applets to capture in exactly the same way you do for links galleries. New entries should then appear in the main panel, corresponding to applets found in the page. Since a single page may contain several screen-capturable regions, you can easily identify which entry corresponds to which region by passing the mouse over the entry in the panel. The region highlights with a red semi-transparent mask.
Once recording has started, you can end it by clicking again on the entry. Leaving the current page also stops the recording.
Note that contrarily to the browsing capture feature, the applet captures considers the static position of the applet, so it is safe to scroll in the page while capturing and it won't affect the generated video.
There are a couple of parameters specific to this feature:
- Applet selector: the CSS-style selector to find capturable regions. If you are familiar with the CSS technology, you can set it up to capture potentially any rectangular region in a page.
- Minimum size to consider applet: the minimum size (both height and width) in pixels to consider capturing the applet.
Using the same applet selection UI, it is also possible to take a still image snapshot of the selected region (no converter required). Click the plus sign in the main panel entry and pick action Take Snapshot.
How to control the number of simultaneous downloads ?
In order to keep network bandwidth for your immediate usage, Video DownloadHelper controls the maximum number of simultaneous downloads. If you request more downloads than that setting, new requests are queued and they begin downloading after previous operations complete.
You can tune the number of simultaneous downloads in the add-on settings, tab Behavior, parameter Max concurrent downloads. By default, this value is 4. If you want for instance to download one video at a time, set it to 1.
How to suggest new sections to put in this HOWTO ?
Please post a message in this forum.
